
“Learn about Spring Boot Security, including its core concepts like authentication, authorization, and role-based access control. Discover how to configure Spring Boot Security, protect APIs, implement JWT, and understand CSRF protection. Perfect for beginners and interview preparation with common interview questions and answers.”
When building a web application, security is one of the most important considerations. Imagine your web application as a treasure chest filled with valuable data, and the users are like the people trying to access it. You need to ensure that only the right people can open the chest, and that no one can steal or damage its contents.
This is where Spring Boot Security comes in. Spring Boot Security is a powerful tool that helps developers protect their web applications by providing mechanisms for authentication, authorization, and overall application protection.
In this blog post, we’ll dive deep into Spring Boot Security. We’ll cover how it works, how to implement it step-by-step, some important concepts, and interview questions related to this topic. Let’s get started!
Table of Contents
What is Spring Boot Security?
At its core, Spring Boot Security is a module that provides security services to your Spring-based applications. It simplifies the process of adding security measures to your applications by providing:
- Authentication: Ensures that users are who they say they are.
- Authorization: Determines what authenticated users are allowed to do.
- CSRF Protection: Protects against Cross-Site Request Forgery attacks, which can trick a user into performing unwanted actions.
- Session Management: Controls how user sessions are managed and how to log users out after inactivity.
Spring Boot Security provides everything you need to handle common security requirements like login forms, role-based access control, and password encryption. It works seamlessly with other Spring components like Spring MVC, Spring Data, and Spring Cloud.
How Does Spring Boot Security Work?
Spring Boot Security can seem complex at first, but the great thing is that much of it is already configured for you. Let’s break it down into simple steps.
- Authentication: When a user tries to access the application, Spring Boot checks their identity by asking for a username and password. The username and password are then verified (usually by comparing against a database or an in-memory list).
- Authorization: Once the user is authenticated, the application needs to determine what the user is allowed to do. Authorization tells the application whether to allow or deny access to certain parts of the app based on the user’s roles or permissions.
- CSRF Protection: Spring Boot automatically protects your application from CSRF attacks by requiring a special token with each request, ensuring that malicious sites can’t trick users into performing unwanted actions on your behalf.
- Session Management: After authentication, Spring Boot manages user sessions and handles actions like logging users out when the session expires or after a certain period of inactivity.
Spring Boot Security is highly customizable, allowing you to define your own authentication mechanisms, login pages, and access control rules.
Step-by-Step Implementation of Spring Boot Security
Now that we understand what Spring Boot Security does, let’s set it up in a simple Spring Boot application.
Step 1: Create a New Spring Boot Project
Go to Spring Initializr and generate a Spring Boot project with the following settings:
- Project: Maven
- Language: Java
- Spring Boot Version: The latest stable version
- Dependencies: Spring Web, Spring Security, Thymeleaf (for templating)
After downloading the project, unzip it and open it in your preferred IDE (e.g., IntelliJ IDEA, Eclipse).
Step 2: Add Spring Security Dependency
Spring Boot Security is already included if you added the Spring Security dependency during project creation. If not, you can manually add it by modifying your pom.xml:
<dependency>
    <groupId>org.springframework.boot</groupId>
    <artifactId>spring-boot-starter-security</artifactId>
</dependency>
Step 3: Create a Security Configuration Class
Next, we’ll create a class to configure Spring Boot Security. This class will define how users authenticate and which pages they are allowed to access. Create a new class called SecurityConfig inside the com.example.securitydemo package:
package com.example.securitydemo;

import org.springframework.context.annotation.Configuration;
import org.springframework.security.config.annotation.web.builders.HttpSecurity;
import org.springframework.security.config.annotation.web.configuration.EnableWebSecurity;
import org.springframework.security.config.annotation.web.configuration.WebSecurityConfigurerAdapter;

@Configuration
@EnableWebSecurity
public class SecurityConfig extends WebSecurityConfigurerAdapter {

    @Override
    protected void configure(HttpSecurity http) throws Exception {
        http
            .authorizeRequests()
            .antMatchers("/", "/home").permitAll()  // Allow public access to home page
            .anyRequest().authenticated()           // All other pages need authentication
            .and()
            .formLogin()                             // Enable login form
            .permitAll()                             // Allow everyone to see the login page
            .and()
            .logout()                                // Enable logout
            .permitAll();
    }
}
Step 4: Create the Login Page
Now let’s create a simple login page where users can enter their credentials. Create an HTML file named login.html in the src/main/resources/templates folder:
<!DOCTYPE html>
<html lang="en">
<head>
    <meta charset="UTF-8">
    <meta name="viewport" content="width=device-width, initial-scale=1.0">
    <title>Login</title>
</head>
<body>
    <h2>Login Page</h2>
    <form action="/login" method="post">
        <label for="username">Username:</label>
        <input type="text" id="username" name="username">
        <br>
        <label for="password">Password:</label>
        <input type="password" id="password" name="password">
        <br>
        <button type="submit">Login</button>
    </form>
</body>
</html>
Step 5: Run the Application
Now that you have configured security, let’s run the application. When you access your app, you’ll be redirected to the login page. Only users who successfully log in will be able to access other pages.
Understanding Key Concepts in Spring Boot Security
Here are some important concepts you should understand to make the most of Spring Boot Security:
- Authentication vs Authorization: Authentication verifies who the user is (e.g., by checking their username and password), while authorization checks what the user is allowed to do after they’ve logged in (e.g., accessing certain pages or resources).
- In-memory Authentication: You can use in-memory authentication, where users and roles are stored directly in the application. However, this is not recommended for production applications since the data is lost when the application restarts.
- JWT (JSON Web Tokens): JWT is often used for stateless authentication in RESTful applications. Instead of storing session information on the server, JWT stores authentication data in a token that’s passed with each request.
- CSRF Protection: CSRF is a common attack where malicious users make unauthorized requests. Spring Boot automatically provides CSRF protection, but it can be disabled in certain cases if you’re building a stateless API.
Interview Questions on Spring Boot Security
1. What is Spring Boot Security, and how does it help secure an application?
Answer: Spring Boot Security is a framework that provides authentication, authorization, and other security features for your Spring Boot applications. It helps secure your application by ensuring that:
- Only authorized users can access specific parts of the application.
- Authentication (verifying who a user is) and authorization (what the user can do) are handled.
- Protection against common security vulnerabilities like Cross-Site Request Forgery (CSRF) and session fixation attacks.
2. What is the difference between authentication and authorization?
Answer:
- Authentication: It is the process of verifying the identity of a user. For example, when a user logs in with a username and password, the system checks if the credentials are correct to confirm who the user is.
- Authorization: After authentication, authorization determines what the authenticated user is allowed to do. For instance, an admin user might have access to all features, while a regular user might only have limited access.
3. How do you configure authentication using Spring Security?
Answer: To configure authentication in Spring Security, you can follow these steps:
- Create a
SecurityConfigclass: ExtendWebSecurityConfigurerAdapterand override theconfiguremethod. - Define authentication mechanism: You can set up in-memory authentication, JDBC authentication, or use a custom
UserDetailsServicefor user authentication.
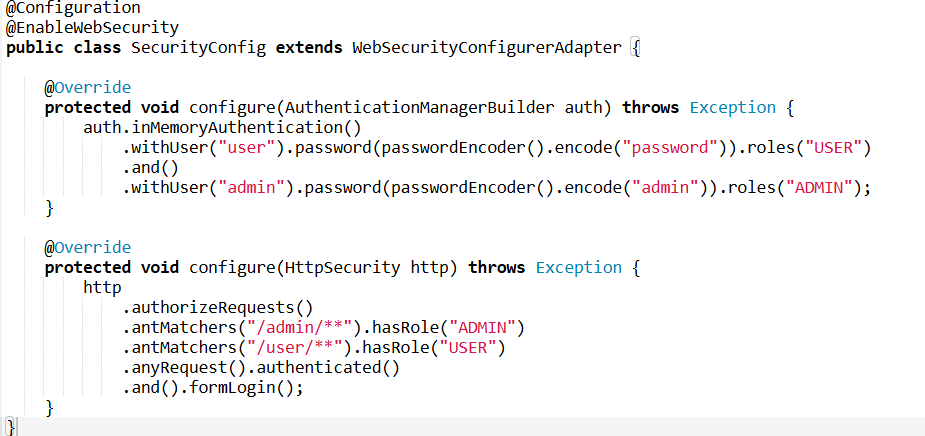
4. Explain the role of SecurityConfigurerAdapter in Spring Boot Security.
Answer: SecurityConfigurerAdapter is an abstract class provided by Spring Security. It is used to configure the security settings for your application. By extending this class, you can customize how authentication and authorization are handled. You typically override methods like configure(HttpSecurity http) for HTTP security settings and configure(AuthenticationManagerBuilder auth) for configuring authentication.
5. What is CSRF protection, and how does Spring Boot Security handle it?
Answer:
- CSRF (Cross-Site Request Forgery) is an attack where an attacker tricks a user into performing an action without their consent, typically when the user is logged into an application.
- Spring Security provides automatic protection for CSRF attacks. By default, CSRF protection is enabled, and it works by requiring a CSRF token for each state-changing request (like POST, PUT, DELETE).
- You can disable CSRF protection if necessary (though it is not recommended):

6. How can you implement role-based access control in Spring Boot?
Answer: Role-based access control (RBAC) can be implemented by configuring Spring Security to grant access to resources based on the roles of the authenticated user.
- First, define roles (like ADMIN, USER).
- Then, use
antMatchers()to map specific URLs to the roles.
Example:

This ensures that only users with the “ADMIN” role can access /admin/** endpoints.
7. What is JWT (JSON Web Token), and how is it used for stateless authentication in Spring Boot?
Answer: JWT is a compact, URL-safe token format used for securely transmitting information between parties as a JSON object. It is commonly used for authentication in stateless applications.
- After a user logs in, Spring Security can issue a JWT containing the user’s information (like username and roles).
- On subsequent requests, the user sends this token in the HTTP header, and Spring Security verifies it to authenticate the user. Example of configuring JWT in Spring Security:

This setup allows stateless authentication using JWT.
8. How do you configure basic authentication in Spring Boot?
Answer: Basic Authentication involves sending the username and password in the HTTP header for every request. You can enable it in Spring Boot with the following configuration:
@Configuration
@EnableWebSecurity
public class SecurityConfig extends WebSecurityConfigurerAdapter {

    @Override
    protected void configure(HttpSecurity http) throws Exception {
        http
            .authorizeRequests()
            .anyRequest().authenticated()
            .and()
            .httpBasic(); // Enable basic authentication
    }
}
This will prompt users to enter their username and password when they access protected resources.
9. What is the purpose of the UserDetailsService interface in Spring Security?
Answer: UserDetailsService is an interface that Spring Security uses to retrieve user-specific data. It provides the method loadUserByUsername(String username) to fetch user details (like username, password, and roles) from a data source (e.g., database).
- You typically implement this interface to load user data from your own database, like so:

10. How can you secure REST APIs using Spring Boot Security?
Answer: To secure REST APIs, you can use JWT for stateless authentication and configure Spring Security to protect your API endpoints.
- JWT Authentication: Issue a JWT token after successful login, and protect API endpoints by requiring the token in HTTP headers.
- Example Configuration:

This setup ensures that only authenticated users with a valid JWT can access the /api/secure/** endpoints.
Companies That Ask About Spring Boot Security
Spring Boot Security is a crucial topic in backend development interviews, especially for Java-based applications. Companies that often ask about Spring Boot Security in interviews include:
- Tata Consultancy Services (TCS): Known for asking about authentication, authorization, and security best practices.
- Infosys: They often assess candidates’ knowledge of securing REST APIs and web applications with Spring Boot.
- Wipro: Focuses on role-based access control, CSRF protection, and session management in interviews for backend development roles.
- Accenture: Candidates are asked about securing Spring Boot applications, including integrating OAuth and JWT for authentication.
Conclusion
Spring Boot Security makes it easy to secure your web applications with features like authentication, authorization, and CSRF protection. By following the steps in this guide, you can get started with securing your Spring Boot app quickly. Whether you’re building a simple application or a complex enterprise solution, understanding Spring Boot Security will help you keep your applications safe from unauthorized access and attacks.
Now that you know the basics, you’re ready to dive deeper into the world of application security, and perhaps even ace your next interview!