
Learn how to set up Vue.js Server-Side Rendering (SSR) with Nuxt.js. This comprehensive guide covers installation, dynamic routing, middleware, and deployment to help you create fast, SEO-friendly web applications effortlessly.
Vue.js, a progressive JavaScript framework, is known for building high-performance, single-page applications (SPA). While SPAs are powerful, they often face challenges with search engine optimization (SEO) and initial page load times. Server-Side Rendering (SSR) addresses these issues by rendering the application on the server before sending it to the client.
What is Server-Side Rendering (SSR)?
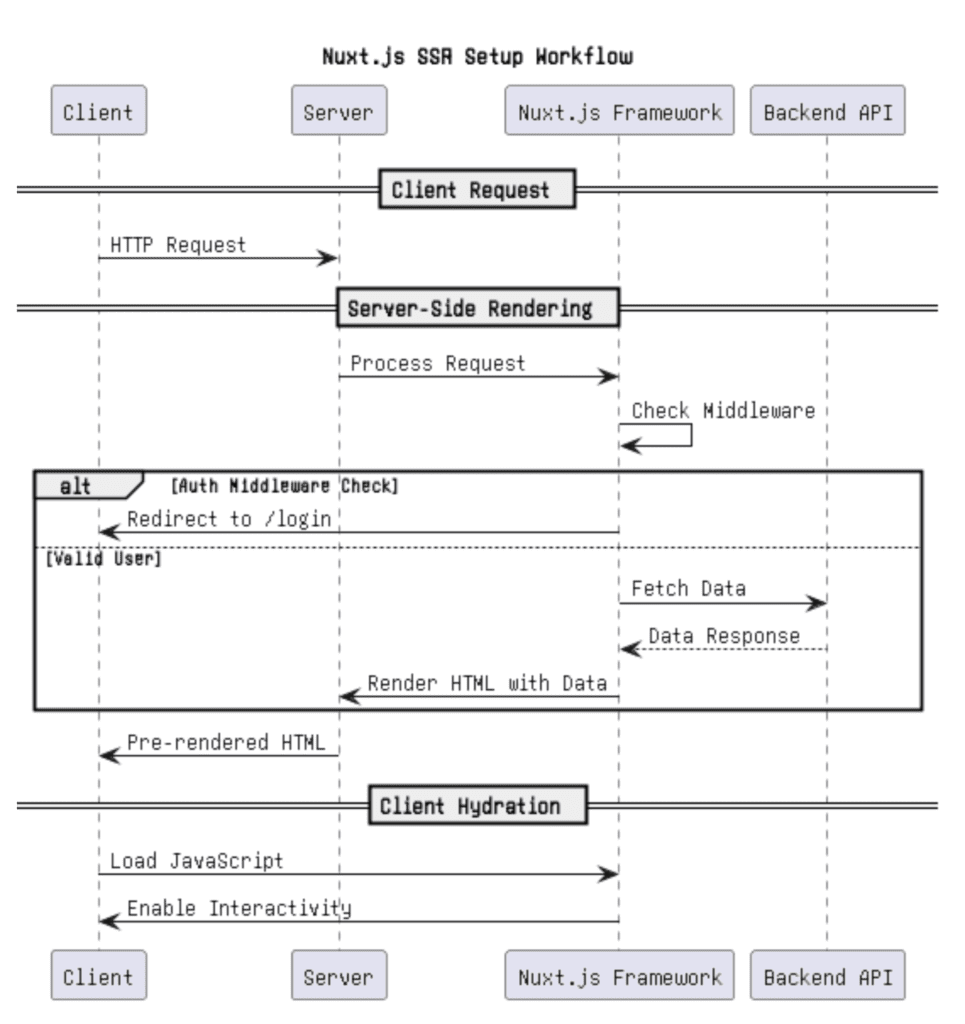
SSR is the process of rendering your application’s content to HTML on the server and then sending this pre-rendered content to the client. This enhances SEO and improves the user experience by displaying content faster compared to traditional client-side rendering.
Table of Contents
Enter Nuxt.js Nuxt.js is a robust framework built on top of Vue.js that simplifies the development of SSR applications. It provides a pre-configured setup, saving developers from managing complex configurations, and adds powerful features like automatic routing, code-splitting, and middleware support.
Why Use SSR in Vue.js Applications?
- Improved SEO: Search engines can easily index server-rendered content, ensuring better visibility in search results.
- Faster First Contentful Paint (FCP): Pre-rendered HTML allows content to be displayed sooner, enhancing the perceived performance.
- Enhanced User Experience: Users can interact with content faster, even if JavaScript execution is delayed.
Setting Up Server-Side Rendering in Vue.js Applications with Nuxt.js
Below is a step-by-step guide to creating a Vue.js SSR application using Nuxt.js:
Step 1: Installing Nuxt.js
- Initialize Your Project: Begin by creating a new project directory and initializing it with
npmoryarn.npx create-nuxt-app my-nuxt-ssr-app - Choose Options: During setup, Nuxt.js will prompt you to select features. For SSR, select:
- Server-Side Rendering (Universal)
- Vuex (if state management is required)
- Additional options as per your project needs.
- Navigate to Your Project:
cd my-nuxt-ssr-app - Run the Development Server:
npm run devYour application will now be accessible athttp://localhost:3000.
Step 2: Understanding the Nuxt.js Project Structure
Nuxt.js comes with a specific directory structure optimized for SSR:
pages/: Each.vuefile in this directory becomes a route automatically.layouts/: Used to define layout templates.components/: Contains reusable Vue components.store/: Manages application state using Vuex.middleware/: Houses functions to execute before rendering pages.
Step 3: Adding Server-Side Rendering
By default, Nuxt.js is set up for SSR. To verify, check the nuxt.config.js file:
export default {
  ssr: true, // Enables Server-Side Rendering
  target: 'server', // Configures the build for a server environment
}
Step 4: Creating Dynamic Pages with SSR
- Add a Page: Create a
pages/index.vuefile with the following content:<template>
<div>
<h1>Welcome to Nuxt.js SSR</h1>
<p>{{ message }}</p>
</div></template><script>export default {
async asyncData() { // Fetch data on the server-side return {
message: "This page is rendered on the server."
}; } };</script>
TheasyncDatamethod fetches data server-side, ensuring it’s available before rendering.
2. Dynamic Routing: Add a dynamic route by creatingpages/posts/_id.vue:
<template>
<div>
<h1>Post {{ id }}</h1>
<p>{{ content }}</p>
</div>
</template>
<script>
export default {
async asyncData({ params }) {
// Simulate fetching data
return {
id: params.id,
content: `Content for post ${params.id}`
};
}
};
</script>
Visiting/posts/1will displayPost 1with its respective content.
Step 5: Using Middleware for Authentication
Middleware is executed before rendering the page. For example, add a middleware/auth.js:
export default function ({ store, redirect }) {
  // Check if the user is authenticated
  if (!store.state.authenticated) {
    return redirect('/login');
  }
}
<template>
  <div>
    <h1>Post {{ id }}</h1>
    <p>{{ content }}</p>
  </div>
</template>

<script>
export default {
  async asyncData({ params }) {
    // Simulate fetching data
    return {
      id: params.id,
      content: `Content for post ${params.id}`
    };
  }
};
</script>
Apply this middleware to a page by adding:
export default {
  middleware: 'auth'
};
Step 6: Deploying the Nuxt.js SSR Application
- Build the Application:
npm run build - Start the Server:
npm run startNuxt.js will generate a production-ready SSR application. - Deploy to a Cloud Provider: Services like Vercel, Netlify, or AWS can host Nuxt.js applications. Most providers support SSR deployments out of the box.
Conclusion
Nuxt.js takes the complexity out of building server-rendered Vue.js applications. Its structured architecture, powerful features, and seamless SSR setup make it an excellent choice for developers aiming to enhance SEO and performance. By following this guide, you can confidently build and deploy SSR applications that deliver fast, dynamic, and SEO-friendly user experiences.